Instructable

Laser-cut astrolabe

One of my readers was kind enough to put together an Instructable on turning the output of my generator into a fully usable plastic instrument.

How to Build a Customized Astrolabe Using a Laser Cutter:

http://www.instructables.com/id/How-to-Build-a-Customized-Astrolabe-Using-a-Laser-/

Laser-cutting with a Metallic Finish

I received a nice email from a user in Argentina, and he has given permission to post some of his photos and notes on how he achieved the lovely result.
“I started generating the EPS files with your software for my southern latitude, and then added some more stars to the rete and a clever-but-mostly-useless device to the sun eccentric in the back, for the leap years.

I then had it laser-cut and engraved on a plastic material we call Metalex here in Argentina, which has a black PVC base with a shiny metallic layer on one of its faces, thin enough to be cut with the laser. In order to give it more weight I laser-cut the same shape on 3 millimeter wood – minus the engraving – and glued the metalex cut-out on it.

Since I wanted the rete and the front ruler to remain thin to avoid parallax (and for better looks), I left them as they were, just the metalex sheet without the wood. And to avoid wear to the thin metallic layer I backed all moving parts with a special paper I found, which has a soft velvety lining on one of its faces. For my next project I’ll probably have it laser-cut to the same shape too.”

metalex front metalex detailmetalex back

Concerning the use of astrolabes as a teaching tool

Version 3.3 of the Astrolabe Generator

As you can see, I’m still working at adding functionality. This release includes:

  • Fixed bug in Arcs of the Signs. Both options now work.
  • Expanded options for the sine/cosine grid scale on the astrolabe back:
    • Grid divided by 60 or 100
    • Optional cosine lines
    • Arcs and radials
    • Lines for each degree option
  • Under the hood:
    • Version number displays in interface now pulled dynamically from pom.xml
    • Default folder for saving is now the folder the app was run from
    • Consolidated file handling in the FileHandler class
    • Updated to Java 1.8

Version 3.3

Version 3.2 Released

Download it HERE

Changes for 3.2:

  • Fixed a bug in the formatting of the shadow square numbers.
  • Added in an option to display all three twilight lines.
  • Added the option of using a concentric calendar ring instead of the more common offset.
  • Added the option to choose between a base 60 and the less used base 10 grid for the sine scale grid on the back.

Version 3.3 is well underway, look for it soon!

The Astrolabe Generator 3.1

As promised more upgrades are coming. Here is the first batch.

  • The first astrolabe variation: The Universal Astrolabe.
  • Added an optional Equation of Time scale to the back

When the using the equation of time scale option is set the alidade will have a scale printed on it. To use, just rotate the alidade to the date and read the time offset using the loop and the scale. The equation of time loop will print over any other scales and is still quite readable. You can download the 3.1 version here.

Universal AstrolabeEquation of Time


The Astrolabe Generator 3.0

After much hard procrastination, I am happy to announce the release of version 3.0 of the Astrolabe Generator.

The old Flash version was difficult to keep improving, and is no longer working in any case. The new, downloadable version has several bugs removed, and much expanded capabilities:

  • Save to folder or zip file
  • Print to EPS printer if available
  • Support for 90N to 90S
  • Expanded range of quadrants.

The good news is that it runs on Windows, Mac, and Linux. The bad news is that some of you will have to install Java in order to run it (There is a link on the download page).

Switching back to Java will allow me to keep updating and improving the tool. and as always, I’m looking for input (see address for comments under Links). Plans for the next version include:

  • Support for multiple languages
  • Output to PDF
  • Output to SVG
  • More astrolabe options
  • More quadrants – For example a Gunter’s Quadrant.

Download HERE.

Astrolabe Generator 3.0

Simulators

One of the problems with learning to use an astrolabe is that in order to work through the class notes the student needs to first print out and assemble their own astrolabe from the provided materials. This takes time and materials that may not be ready to hand.

What I’ve wanted to do for a while now, was to provide an online simulator to allow the student to work without a physical copy of the device. In the past I ave played with Flash and Java, but these had significant problems with getting them to work smoothly with the Internet. Instead, I settled on HTML5 and JavaScript. Much more flexible and simple to use, and supported by all modern browsers.Simulator

There are currently two simulators available: One for the astrolabe and one for the sine quadrant. These are a work in progress and improvements are planned, but they work well as they are.

http://www.astrolabeproject.com/sim/astrolabe/sim.html
http://www.astrolabeproject.com/sim/sine/quad.html

The simulators have been tested on current versions of Internet Explorer, Firefox, Chrome, and Safari. (Note: if you are on an IPad, you can save the simulator page to your desktop and it will function like an app, still requiring an Internet connection though).

The Astrolabe Simulator
The astrolabe simulator can be found at (link). Clicking and dragging the rate rotates it, the same with the pointer arm. Clicking on the pushpin on the upper right locks the rete and arm together and allows them to be moved together. Clicking on the icon upper left flips the astrolabe to the back side.

The Sine Quadrant Simulator
The sine quadrant simulator can be found at (link). The cord can be rotated by clicking and dragging the weight on the end. The index bead (green circle) can be moved by dragging it. Function lines can be toggled on and off by clicking on the check marks bottom right.

The source code for both simulators is open source and can be downloaded here(link).

Enjoy!

Introducing the Advanced Astrolabe

For quite some time now I have been basing my class, and my discussions here, on an astrolabe with fairly basic options. Linked to the right you will find a zip file containing the components for this basic astrolabe, along with the handout for my class.

But there is more to the astrolabe than just the basic functions I have discussed so far. An examination of astrolabes from the medieval period shows a wide range of advanced function options available to the users. Over time, I have started to add some of these slowly to the Astrolabe Generator application, so that people out there can play with them. But up to now I have not spent any real time discussing of how they are used. Over the next few weeks I hope to examine several of these advanced functions.

I have rearranged the links on the left and added a new download: An Advanced Astrolabe example. This differs from the Basic example in several ways. On the front you will see new markings on the plate for the Houses of Heaven; on the back I have added a sine/cosine scale (upper left), an Arcs of the Signs scale (upper right) and the Lunar Mansions (center). In the next few posts I will discuss the purpose and use of each of these in turn.

 Advanced astrolabe

Advanced Astrolabe Functions: Estimating the direction to Mecca.

Given that the math and sciences of the Middle East were a major driving force in the development of the astrolabe[1], it is reasonable that some of the advanced functions are related to the dominant religion of the area, Islam. Today we will discuss using two of the astrolabe’s advanced features to estimate the direction of Mecca.

For a Muslim, knowing the direction to Mecca from one’s current position is not just important because of the requirement to pray in that direction five times daily. In addition, the ritual butchering of food animals needs to be done with that direction in mind for the meat to be acceptable to the dietary laws; and when bodies are buried, they need to be placed on their sides, facing toward Mecca[2]. The specific location of the Kabaa, the focus of prayer is 21.4N 39.8E[3].

Determining this direction, known as the Qibla, is a major subject in Islamic mathematics. The Qibla is defined as being the “Great Circle” direction between a given point and the location of Mecca[4]; and there are many treatises devoted to computing it accurately. But in the case of a traveler, without access to intricate mathematics or carefully computed tables, finding the proper direction is tricky.

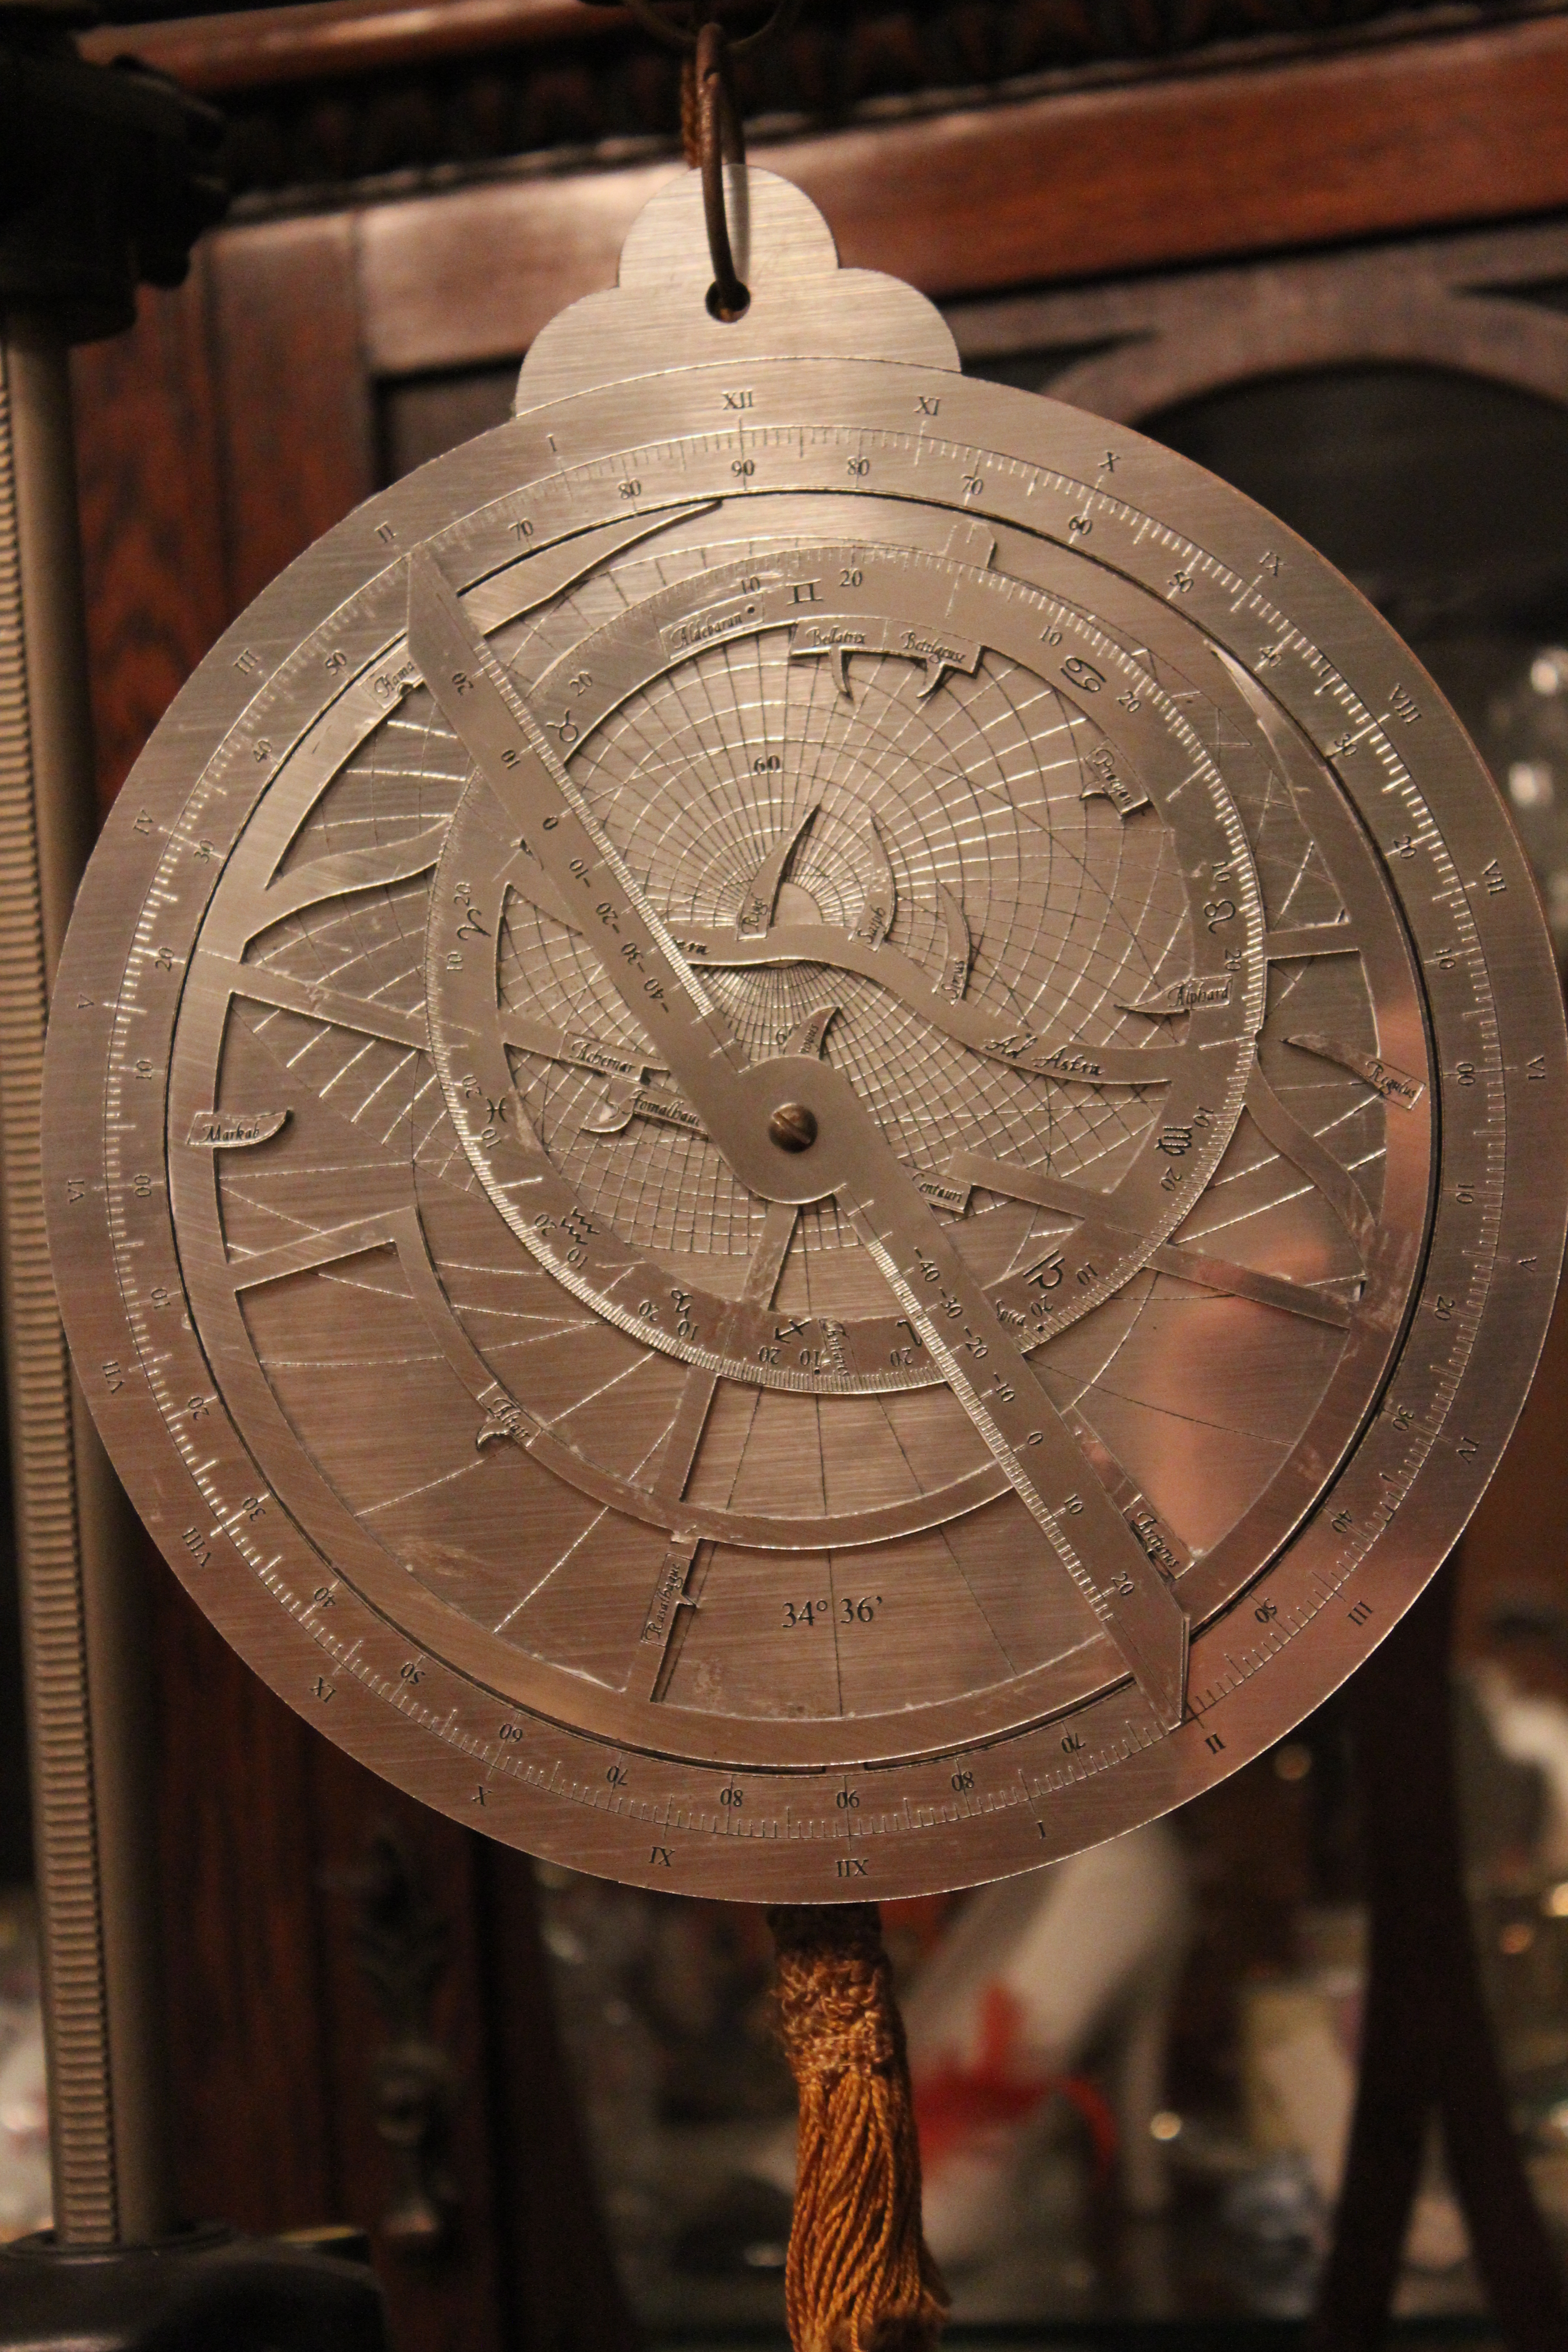
There are two scales to be found on the back of a typical astrolabe of the region that can help with this problem.

Estimating the Qibla using the Sine/Cosine scale
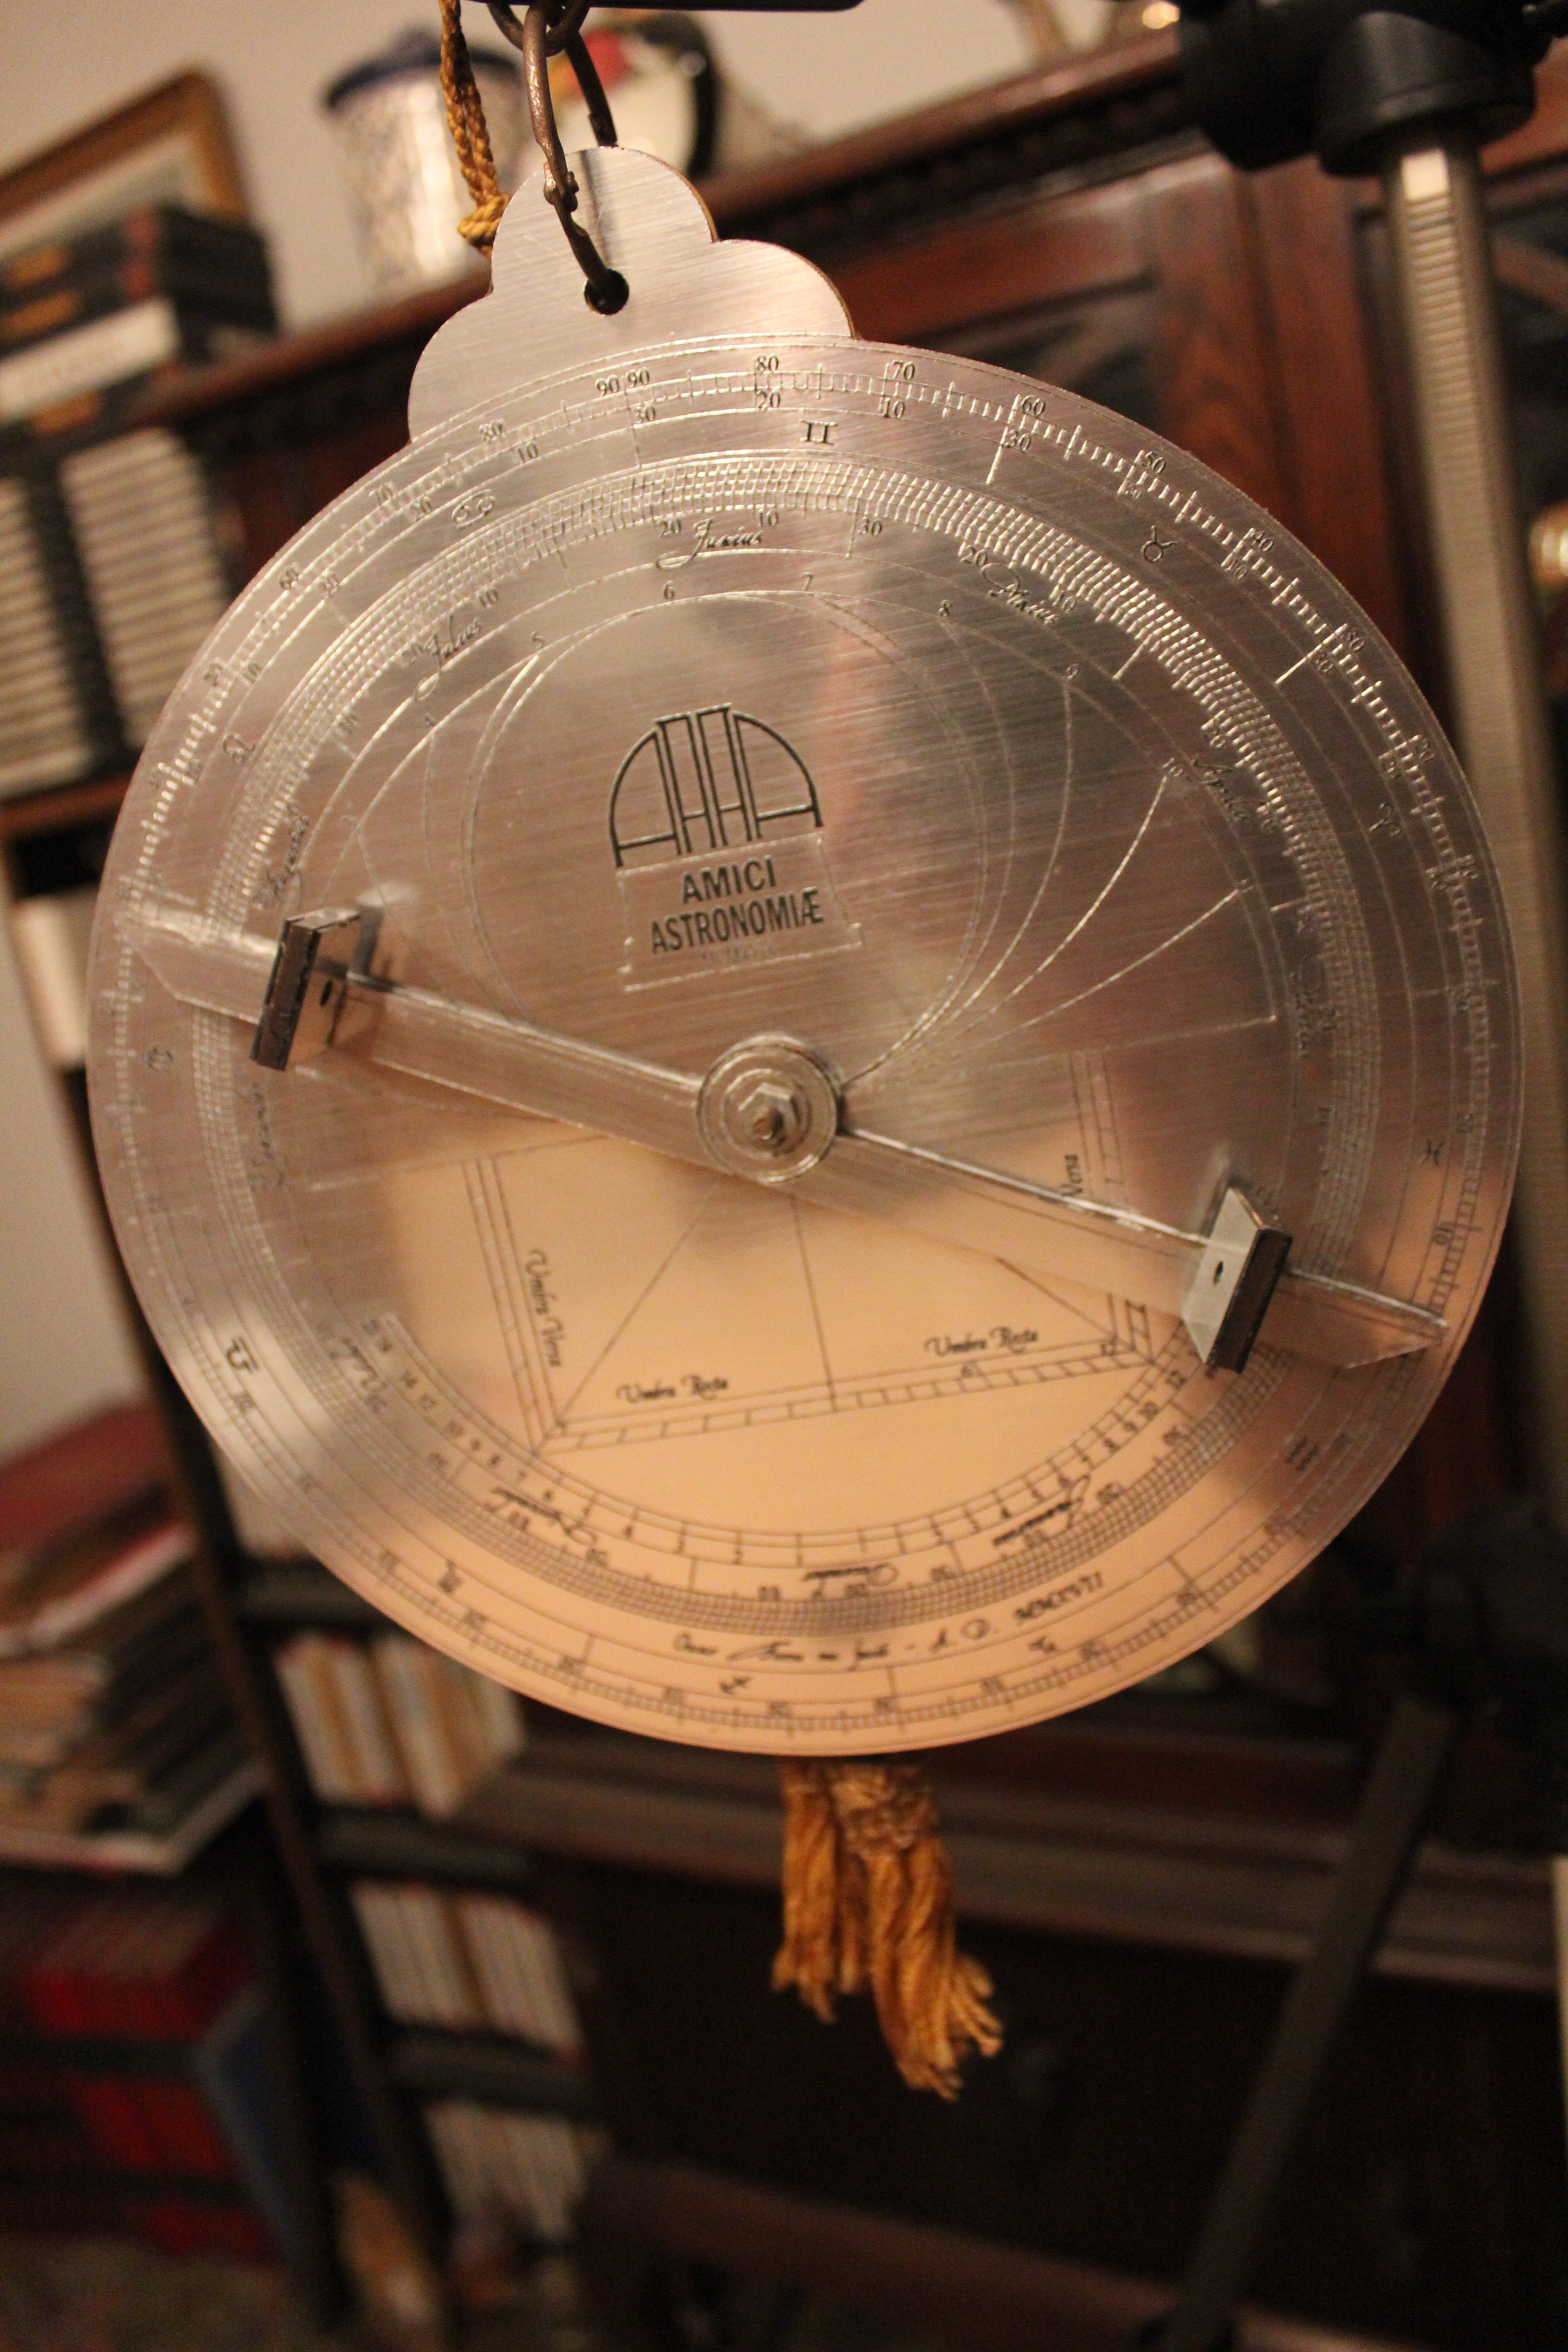
It is possible to get a rough estimate of the qibla direction by using the Sine/Cosine scale to be found on the back of many astrolabes[5]. To use this scale the user must know the latitude and longitude of Mecca, as well as their own current latitude and longitude[6].

To use the sine/cosine scale, work the problem as follows:

  • First, find the difference in latitude between the two positions
  • Next, find the difference in longitude.
  • Set the pointer or alidade of the astrolabe to point at an angle from horizontal equal to the difference in latitude. Mark the line from there to the sine scale mentally.
  • Set the pointer or alidade to point at an angle from vertical equal to the difference in longitude. Mark the line from there to the sine scale mentally.
  • Set the pointer to the point where the two lines cross. The pointer will now point to a direction. You will need to determine whether the direction given is to the North, South, East, or West. For example, if you are North and East of Mecca, the qibla direction will be measured from West.

Finding the direction to Mecca using the sine/cosine scale

Example:
Finding the Qibla from Alexandria Egypt (location: 31.2N 30.0E)

The difference in latitude (rounding off) is: 10 degrees
The difference in longitude is: 10 degrees

Work the problem as below: Measure up ten degrees from the horizontal scale(1) for the difference in latitude(2), and ten degrees from the vertical scale(3) for the difference in longitude(4). Place the rotating arm on the intesection of the two imaginary lines(5) and it will point at an angle(6), 45 degrees in this case. As Mecca is east and south of Alexandria, this angle will be the angle south of due East. So add it to 90 degrees to get the compass bearing (135 degrees). Using the ruler function in Google Earth (which conveniently uses great circles) The great circle direction to Mecca is 135.68 degrees.

Finding the direction to Mecca using the sine/cosine scale

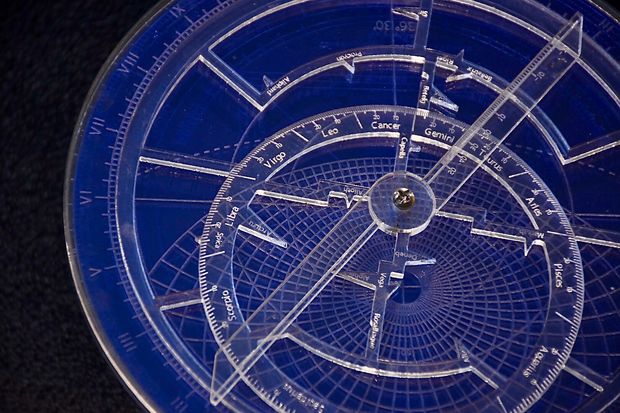
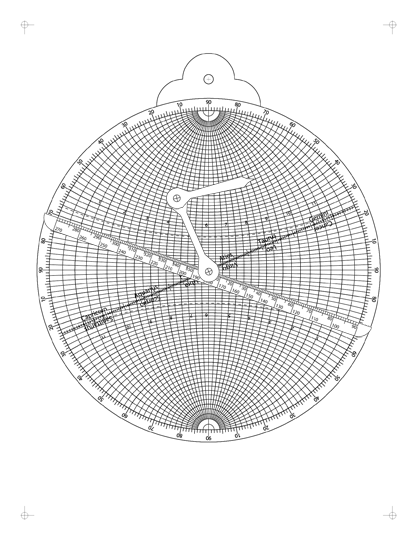
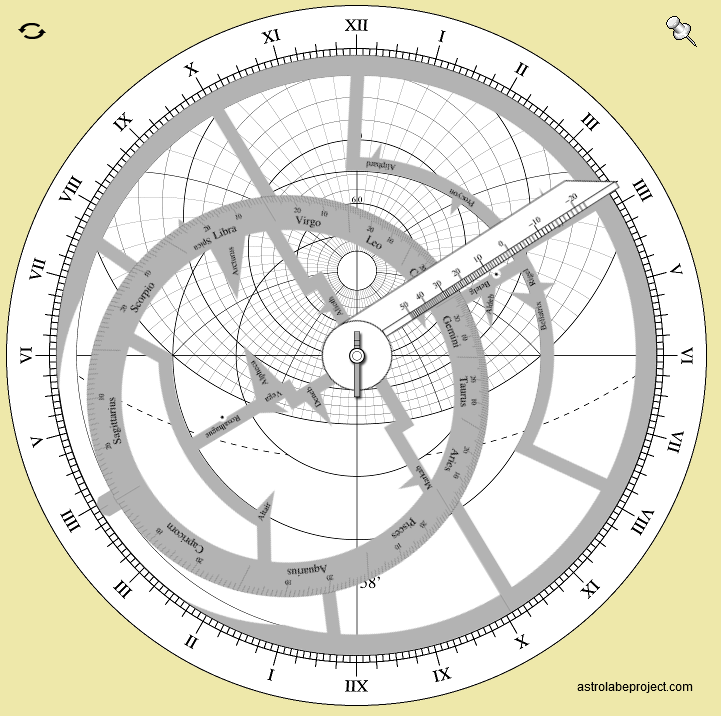
Determining the Qibla using the Qibla line on the arcs of the signs scale
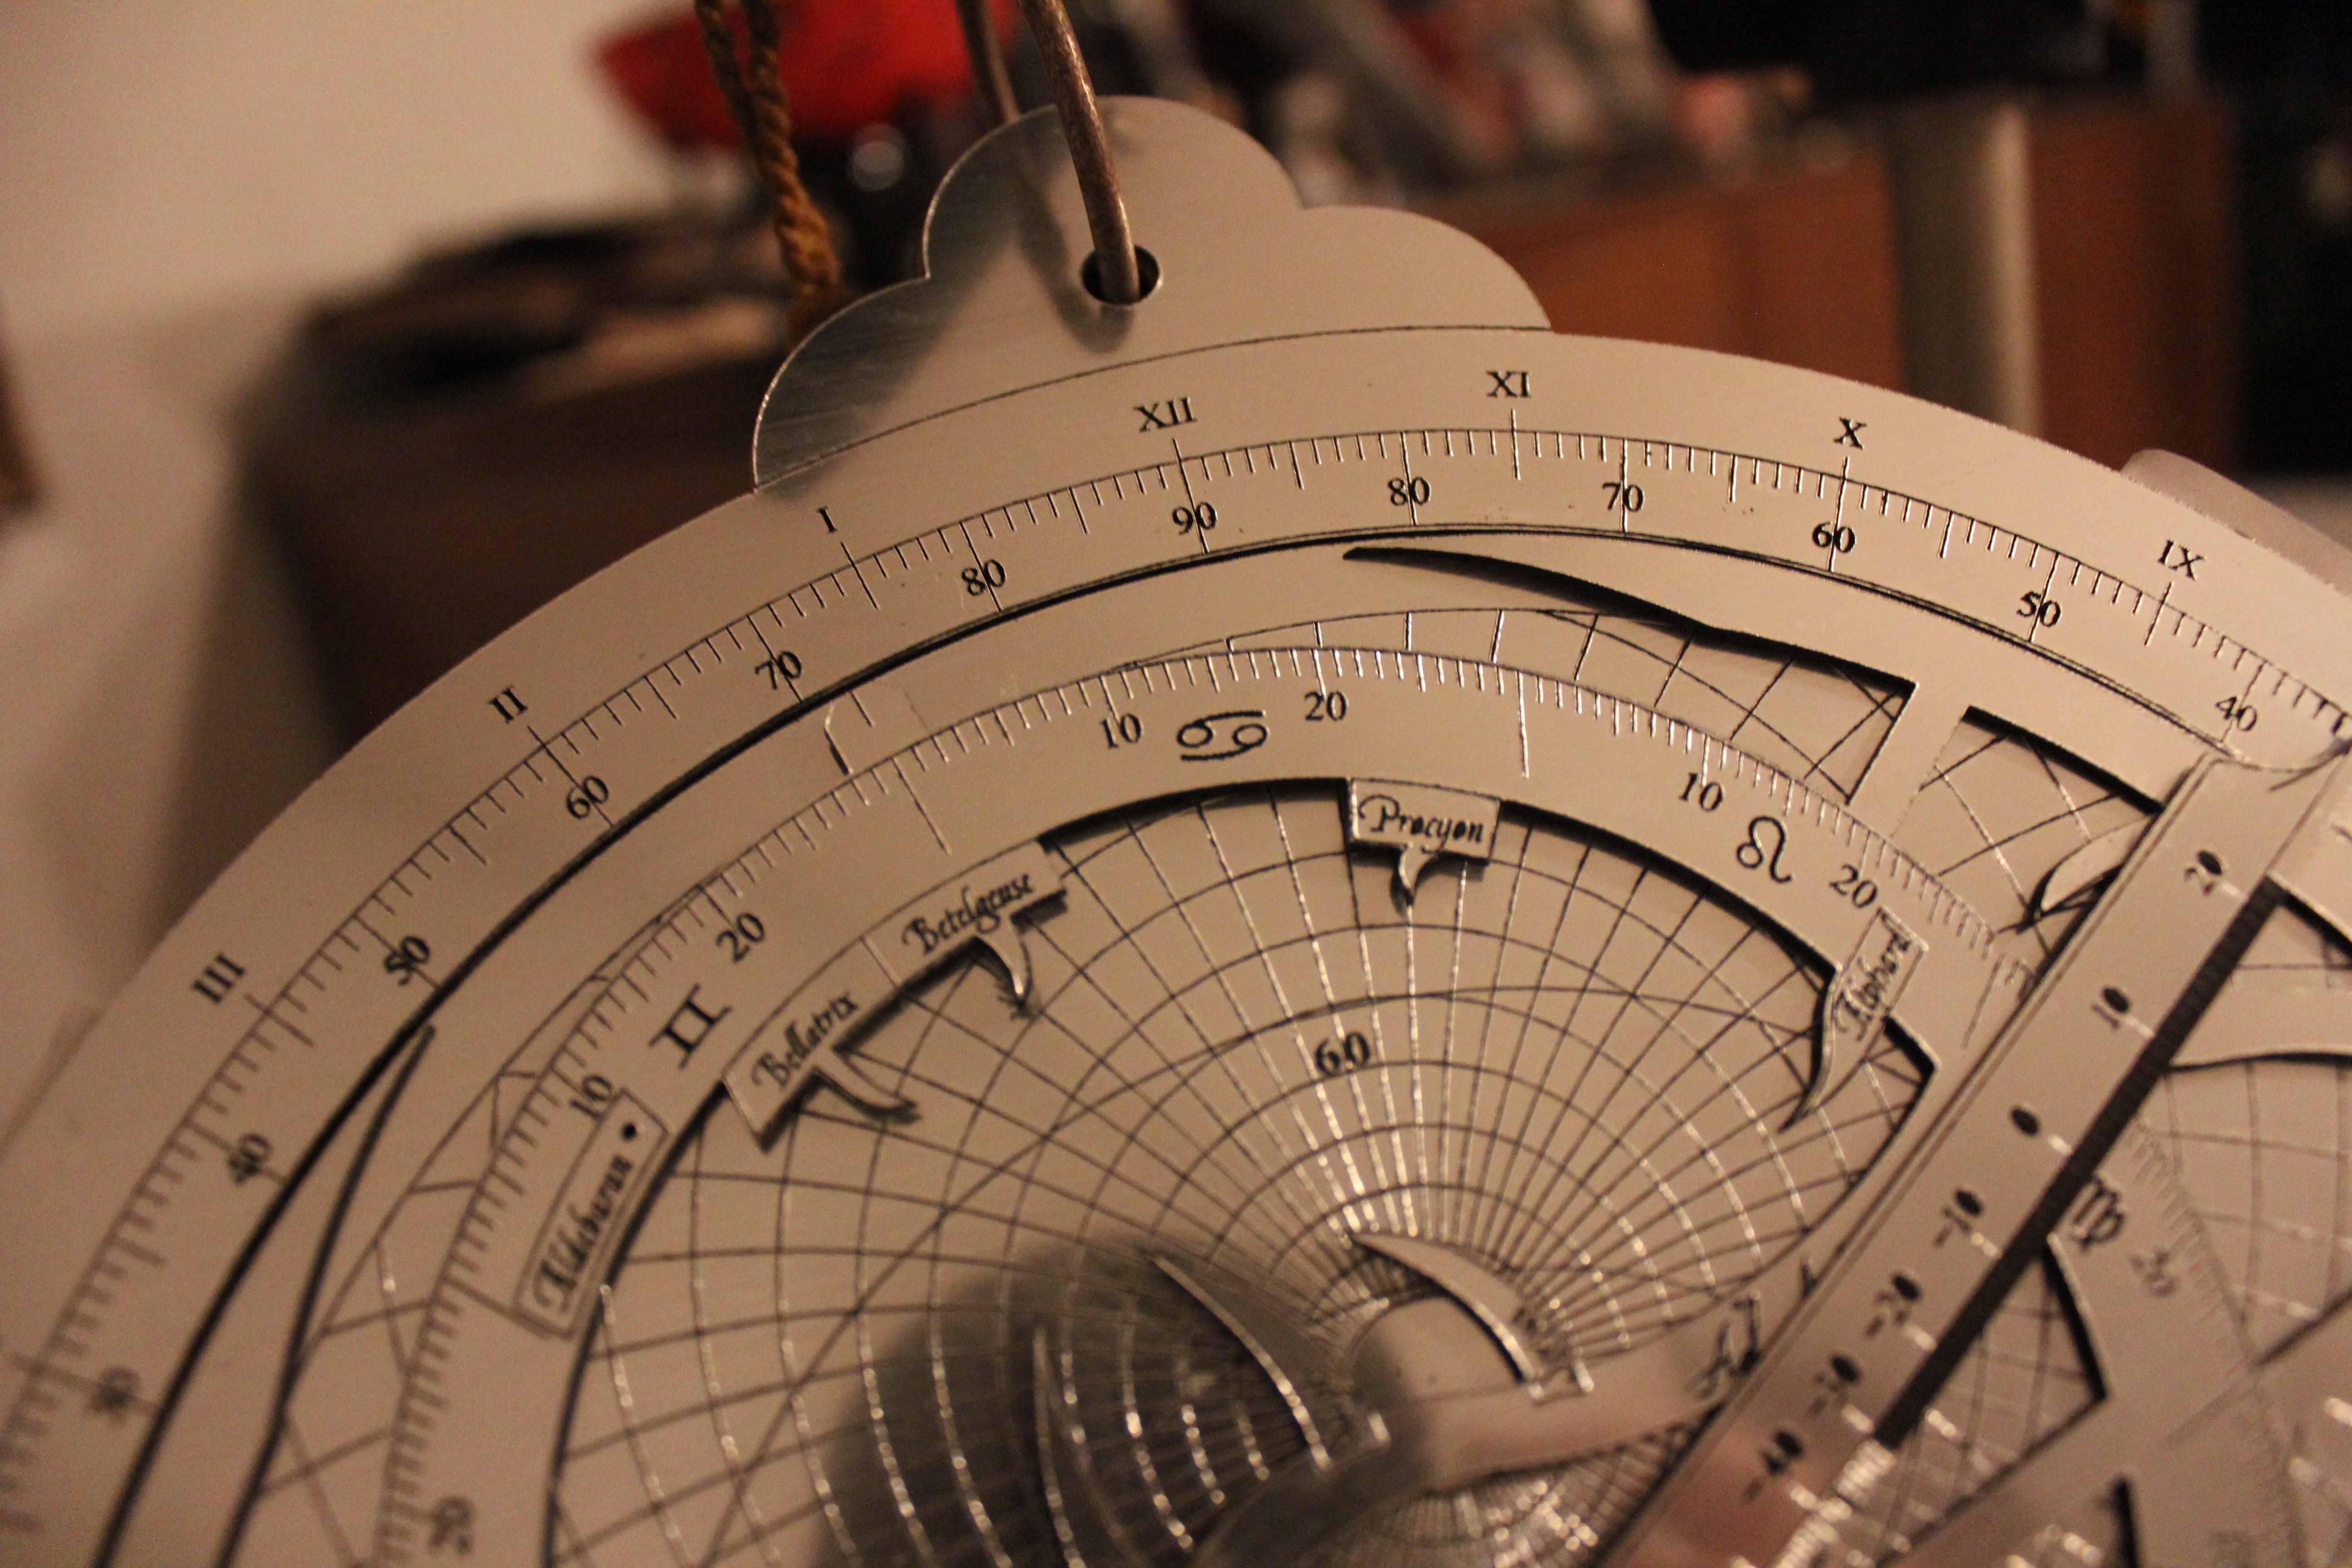
On many astrolabes there is a scale that shows the altitude of the Sun at Noon for every day of the year. This scale is in the form of a series of ninety-degree arcs marked with the various zodiac symbols representing the location of the sun on the ecliptic. In addition to one or more curved lines representing the altitude of the Sun at noon, many of these are also marked with a set of arcs labels as major cities. These arcs can be used to determine the direction of the Qibla if the user is near one of the cities listed.

To determine the rough Qibla direction using the arcs of the signs, do as follows:
– find the Sun’s position on the zodiac using the zodiac and calendar rings of the astrolabe.
– Find the city line for the city you are near.
– Find the point on that line that is in the arc for the sun’s current zodiac position.
– Set the astrolabe’s alidade/pointer to touch this point. The alidade will point to an angle on the rim.
– When the sun is at this angle above the horizon, it will sit directly above the Qibla direction.

Finding the direction to Mecca using the arcs of the signs

Example: Find the direction to Mecca from near Bagdhad Given the date is the Spring Equinox (March 20th).

  • First find the position of the Sun on the ecliptic for the Spring Equinox (I cheated to simplify. The First Point of Aries marks the Spring Equinox, no need to look it up).
  • Rotate the alidade/pointer to the point where the Bagdhad line crosses the arc marking Aries 0 (1) and it will point to an angle(2). In this case, for this date, 55 degrees. So when the sun is at an angle of 55 degrees, it is shining directly over the point on the horizon that marks the direction to Mecca.

Limitations
Clever as these techniques are, they are limited in usefulness. As the Qibla is a great circle line between points on the globe, the further you are from Mecca, the more inaccurate the estimate found by the first method will be. For example in the city of Casablanca (location:33.5N 7.5W) the Qibla direction is about 93.5 degrees but if you estimate it using the sine/cosine scale you get a direction of 106 degrees.

The second, arcs of signs, method is similarly limited. It does provide the great-circle direction, but because the sun has to be up and in the direction of Mecca to work, it is pretty much limited to locations within 90 degrees of Mecca.

Notes:
[1]Morrison, James E., The Astrolabe, Janus, 2007, pg. 31
[2]King, David A. and Lorch, Richard P., “Qibla Charts, Qibla Maps, and Related Instruments”. The History of Cartography, Volume 2, Book 2: Cartography in the Traditional East and Southeast Asian Societies, University Of Chicago Press, 1995. pg 198.
[3]http://en.wikipedia.org/wiki/Kaaba
[4]http://en.wikipedia.org/wiki/Qibla
[5]This technique also works on the sine quadrant, of course.
[6]King, David A., World Maps for Finding the Direction and Distance to Mecca: Innovation and Tradition in Islamic Science, Brill:1999, pp 57-60